Trader Joe's Favorties

posted on: Thursday, February 28, 2013

The last year I've eaten strictly Paleo. I've been doing some healing from migranes which stemmed from some viruses I was running and leaky gut etc. In doing the Paleo diet, I get so many questions about what I eat and where I get it. I've compiled a little list of some of my Trader Joe's favorites. I buy tons of other basic groceries there, but these are some of the prepackaged things that make getting variety, in veggies, meat, nuts and seeds, easier. I've also included some of my favorite gluten-free products which I still feed my kids because they have yet to be convinced that a lettuce wrapped burrito is the same as a regular one...

Uh... where to start?...


Broccoli Slaw
Pre-packaged pomogranate seeds (for salads)
Bag of Micro-greens (for smoothies, salads and sauteing)
Nitrate-free hot dogs and bacon
Free-range, Organic chicken (everything from the whole to the pieces)
Raw-milk cheddar cheese
Handful of nut combos (anti-oxidant is my favorite)
Organic Beef Jerky
Marcona almonds with rosemary and sea salt
Seaweed Snack (made with Canola oil, blech, but still pretty when craving chips)
Red Quinoa blend
Brown rice tortillas
Brown rice bread
Frozen garlic, basil and cilantro cubes (great mixed with the Quinoa, recipe to come...)
Grass-fed ground beef & steaks (they just started carrying this in the frozen food section)
Coconut chips (made with cane sugar but to die for!!)
Almond meal for baking and breading

These are just a few of my staples. More to come...

Cleanse week!

posted on: Wednesday, February 27, 2013

Monday I started a 4 day cleanse through the Beaming in Del Mar. It is an amazing low-glycemic raw food cleanse and I love it. The Reset. Renew. Rejuvenate cleansing program is a unique cleanse using only organic, whole plant-based foods & juices. They take care of all the details for you. Not a juice fast or a powder-based cleanse or deprivation diet, this is real food that allow you to heal and nourish your body. Everything is prepared fresh daily and you pick up your goodies the night before for each day. Here is basically what you get:


16 oz Beaming Green Juice or Beaming Zing Juice or one of our many other delicious juices!
16 oz Superfood Smoothie or Mojo Maca Smoothie or Radiant Nut Milk
16 oz Raw’kin Soup (raw) or Power Soup (warm)
16 oz Beaming Green w/e3live or Beaming Zing w/e3live
16 oz Superfood Elixers
16 oz Beaming Salad with delicious dressing & spicey seeds
Beaming cleansing herbal teaAloe & Chlorophyll shot (2 of 4 days)
Daily email support & inspiration
Discounts to local spas and wellness practitioners
30 page Post Cleanse ebook

I'm also incorporating a serving of cultured veggies each day as well as my own probiotics, digestive enzymes, and a few other immunity boosting supplements. I'm on day 3 and so far it's going great, feeling pretty good.  I'm a big eater and very active so I've gotten pretty hungry in the morning. Yesterday and today I needed to add a hand full of sprouted pumpkin seeds to get by.

On a side note, I tried to do this cleanse myself about 2 months ago and spent 2 days getting all the array of veggies and powders together and I think I was pretty successful at the DIY... but never again. It was such a pain and sooooo much work for as much food as you need to sustain yourself, I was honestly making something every half hour. It was too much stress and defeated the purpose of the cleanse for me, which is to slow down, take some time for myself and get on track. Beaming does it first class, I am very impressed by their knowledge and products.


Farmer Friday: Radish and Green Tomato Salsa

posted on: Friday, February 22, 2013

So every Thursday I pick up my farmers market bag from our local pick-up location. It is always filled with the best, local, seasonal produce and I love not knowing exactly what I'm going to get each time. It's like Christmas every week! I've decided to post about my favorite bag item and coordinating recipe every Friday and hopefully overtime I'll have a nice collection of seasonal recipes that I can look back on and reference.

This week, I received radishes, beets, red leaf lettuce, collard greens, oranges, a pomelo, some snap peas and green onions. I normally do a ton with collard greens and sometimes the lettuce doesn't even make it into a salad if I'm feeling munchy while cooking so this week I'm going to use the big bunch of radishes in this great salsa recipe I found. 

This is great on fish tacos or grilled Mahi Mahi. We are a huge salsa family so it goes fast.

Radish and Green Tomato Salsa


Ingredients:

1 cup of chopped green tomatoes
1 cup of diced radishes
1-2 jalepenos
1/2 a medium white onion
1/4 teaspoon of minced garlic
1/4 teaspoon of finely chopped cilantro
juice from 1 lime
spalsh of EVOO

Toss all the ingredients together and season with a little salt and pepper. Place in the refrigerator for up to 12 hours to let the flavors marry before serving.

Recipe from Fig and Fauna
ngredients 1 cup chopped green tomatoes 1 cup diced radishes 1 - 2 jalapenos (seeded and minced) 1/2 medium white onion (finely chopped) 1/4 teaspoon minced garlic 1/4 teaspoon finely chopped cilantro 1 lime (juiced) splash unrefined extra virgin olive oil

Copyright 2013, Nourished Kitchen, LLC. All rights reserved. No part of this content may be republished without express, written consent.Ingredients:
Wildly fresh with the verdant nuances of spring, this salsa can be plucked from the garden early, tossed together in an instant and served or refrigerated for up to twelve hours to allow the flavors to marry.

Copyright 2013, Nourished Kitchen, LLC. All rights reserved. No part of this content may be republished without express, written consent.

Sweet Potato Hash

posted on: Tuesday, February 19, 2013

Let's hash it out... with sweet potatoes!! Yum. Here is my favorite recipe. I tend to septuple it because I feed more than 2. But it is such a great alternative to hash browns or toast with fried eggs.


Ingredients (serves 2):
  • 1 large garnet yam (yam and sweet potato are interchangeable)
  • 1 big pinch of kosher salt
  • Several turns of freshly ground black pepper
  • A few shakes of garlic powder
  • A couple of dashes of onion powder
  • A sprinkle of dried herbs (I used Penzeys Parisien Bonnes Herbes)
  • 2 tablespoons fat of choice (I used lard)
This recipe and photos are from Nom Nom Paleo, because they were just better than my own. Nom Nom paleo is amazing. More on that to come:

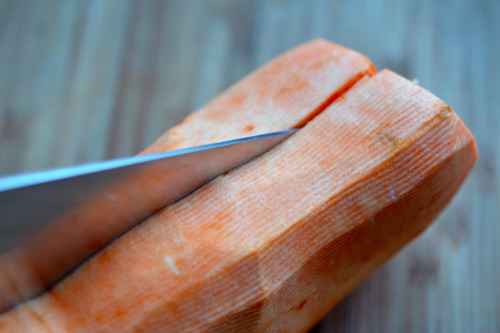
Peel and cut the yam lengthwise so the slices fit in the feeding tube of your food processor.

Attach the julienne slicer blade to the machine and shred the yams.

Transfer the shredded yams to a large bowl and toss with salt, pepper, garlic and  onion powders, and dried herbs.
Heat the fat in a large cast iron skillet over medium heat. When the oil is shimmering, add the seasoned sweet potatoes/yams.
Toss everything in the fat and stir-fry for a minute. Then, pop on a lid for a few more minutes while the yams cook. The hash is ready when there’s some crunchy brown bits and texture is soft and tender.

Let's talk eggs...

posted on: Thursday, February 14, 2013

I feel pretty passionate about good quality eggs. To me, they are like Earth's perfect food, so when they are not perfect, it really bothers me. Growing up with chickens gave me whole new perspective on eggs as a child. There is a lot of confusion about the kind of eggs available in the stores now. A lot of people are unaware of the difference in eggs. Some think that by buying "Free-Range" or "Cage-Free" that they are getting the best quality. This is just not true. The definition of “free range” or “cage free” is that they give the chickens “access to the outdoors”. They’re crowded into large, windowless sheds and they rarely ever go outside. Chicken should eat bugs, grubs, seeds and grasses that they find outside on their own... and definitely not be fed soy. What you want is technically called a Pasture raised egg. A good quality egg should have an orange yolk, not yellow. It's the most beautiful color and I get a little giddy every time I crack open that pasture raised egg. The best place to find pasture eggs are generally your local farmers markets, however if you're having a tough time finding them there you can always check with your local Weston A. Price chapter. Cheeseslave also has a great breakdown on this topic and what to look for.

Eggs come in all shapes and sizes!


 Mmmmm, orange yolk! And a couple of my favorite ways to enjoy this perfect food.

Warm Lemon Vinaigrette - Best salad dressing ever

posted on: Wednesday, February 13, 2013

This is my all time favorite salad dressing. It's a little labor intensive, but the result is so dang good and if you make enough, it will last for at least 3 or 4 salads, unless you're like me and drink it with a straw. Kidding... but not really.

Ingredients:
3 cups of fresh lemon juice
1 to 2 Shallots - Coarsely chopped
2 Cloves of Garlic
1 Tbsp of Honey
1 Cup of Olive Oil
Salt and Pepper to taste

Procedure:
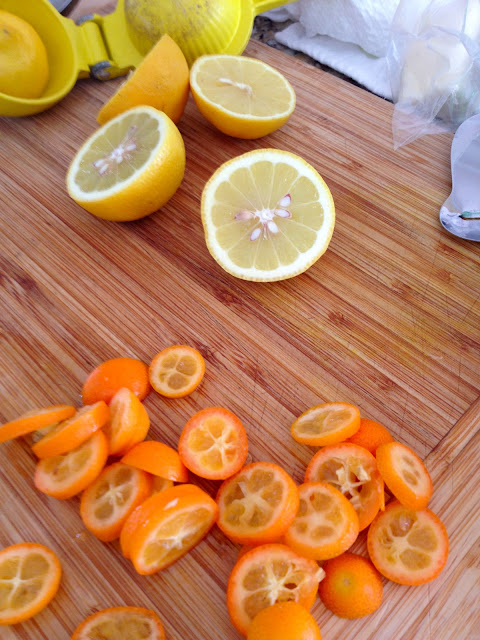
In a medium sauce pan simmer the shallot, garlic, lemon juice and honey until it reduces to about 1/2 cup. Place the reduced syrup in a blender, add olive oil and salt and pepper and blend until smooth. I normally double my recipe but I tend not to use all 3 cups of lemon juice as it can get pretty tart. I found if I double the recipe but only do about 4 cups of lemon juice it turns out perfect. I normally serve it with Arugula, sliced Kumquats, shaved almonds and some shaved Parmesan cheese. Oh dang. It's too good. 


"Good broth will resurrect the dead." South American proverb

posted on: Tuesday, February 12, 2013

I'd like to talk about something that is very near and dear to my heart, bone broth. I grew up on the good stuff. My Mom is a professional bone broth-er and I swear it's magic in liquid form... that and dry ice (how amazing is that frosty chemical smoke)! Anyway, the very best cookbook is Nourishing Traditions, by Sally Fallon. It's my food bible. She has wonderful recipes and her philosophy is spot on. This is tied into the whole Weston A. Price Foundation and Price Pottenger, more on that later. But for now, here is Sally's chicken bone broth recipe. I tend to like to use at least 2 chickens because it make the broth so much more gelatinous and flavorful. I get my free range chickens at Trader Joes and have yet to find a good source for them locally in San Diego... but I'm on the hunt. Cluck cluck! Stay tuned for my beef broth photos, yum!

Here are a few photos of my broths. Different colors in the gelatinous broth is from different herbs and veggies I added while boiling:

This is what it looks like when I add it to my soup:

Ingredients:

1 whole free-range chicken or 2 to 3 pounds of bony chicken parts, such as necks, backs, breastbones and wings*
gizzards from one chicken (optional)
2-4 chicken feet (optional)
4 quarts cold filtered water
2 tablespoons vinegar
1 large onion, coarsely chopped
2 carrots, peeled and coarsely chopped
3 celery stalks, coarsely chopped
1 bunch parsley
*Note: Farm-raised, free-range chickens give the best results. Many battery-raised chickens will not produce stock that gels.

If you are using a whole chicken, cut off the wings and remove the neck, fat glands and the gizzards from the cavity. Cut chicken parts into several pieces. (If you are using a whole chicken, remove the neck and wings and cut them into several pieces.) Place chicken or chicken pieces in a large stainless steel pot with water, vinegar and all vegetables except parsley. Let stand 30 minutes to 1 hour. Bring to a boil, and remove scum that rises to the top. Reduce heat, cover and simmer for 6 to 8 hours. The longer you cook the stock, the richer and more flavorful it will be. About 10 minutes before finishing the stock, add parsley. This will impart additional mineral ions to the broth.
Remove whole chicken or pieces with a slotted spoon. If you are using a whole chicken, let cool and remove chicken meat from the carcass. Reserve for other uses, such as chicken salads, enchiladas, sandwiches or curries. Strain the stock into a large bowl and reserve in your refrigerator until the fat rises to the top and congeals. Skim off this fat and reserve the stock in covered containers in your refrigerator or freezer.

N'oatmeal cacao nib cookie

posted on: Monday, February 11, 2013

I've recently gotten brave enough in the last 6 months to try some paleo desserts. I normally don't ever make any desserts at all because the sugar is so addicting I can never have just one. I found the original recipe in Make It Paelo and have since altered it each time to create my own version which I like much better. They were the N' oatmeal raisin cookies, but I'm not a huge fan of raisins so I swapped out a few ingredients.


Ingredients:
2 cups of almond meal
1/2 cup flax seed meal
1/2 cup unsweetened shredded coconut
1/2 cup raw sunflower seeds
1/2 cup small macadamia nut pieces or walnut pieces or any other nut you're nuts for
1 tbsp cinnamon
1 tsp salt
1 tsp baking soda
2 eggs
1/2 cup maple syrup (most of the time I do less, like 1/4 cup)
1 tsp vanilla extract
1/2 cup coconut oil
1/2 cup cacao nibs (regular or sweet nibs)

Process:
1. Preheat oven to 325 degrees F
2. In a large mixing bowl, combine dry ingredients.
3. In a small mixing bowl, combine eggs, maple syrup, vanilla extract and melted coconut oil with a hand mixer
4. Stir in wet ingredients into dry ingredients
5. Stir in the nibs
6. On a parchment lined baking sheet, drop tablespoon-sized amounts of the cookie batter
7. Bake the cookies for 15 minutes.
8. Allow cookies to cool and then eat the whole batch in one sitting... I mean enjoy.

Where it's at: Mosey's Kitchen

posted on: Sunday, February 10, 2013

Welcome to my kitchen! This is my first post and I'd thought I'd share a photo of the space I spend a lot of my time. I am starting this blog as sort of completion to the quad that is my family. My mother is a massage therapist, energy healer, body ecologist, real food lover, nutritional extraordinaire. My father is a plant pathologist, master gardener and lover of all things naturally beautiful and life giving. My brother is a self taught chef and in the middle of studying to become a Osteopathic Doctor. My take on nutrition, food and healing is the practical application of all these and how real food can be used to heal and nurture in everyday life. I'll dive into the challenges we face when feeding kids and ourselves as busy professionals, athletes, mothers or just plain ol people that like to eat good things. This is a blog about real food, real people, good fats, vegetables, meat and other proteins, my journey with and without grains and how to see the beauty in all of it, enjoy the process and make it look pretty in the end.  


Mosey's Kitchen All rights reserved © Blog Milk Powered by Blogger